Aviad Elbaz
Purge old files on Linux/Unix using “find” command
I've noticed that one of our interface directories has a lot of old files, some of them were more than a year old. I checked it with our implementers and it turns out that we can delete all files that are older than 60 days.
I decided to write a (tiny) shell script to purge all files older than 60 days and schedule it with crontab, this way I won't deal with it manually. I wrote a find command to identify and delete those files. I started with the following command:
find /interfaces/inbound -mtime +60 -type f -maxdepth 1 -exec rm {} \;
It finds and deletes all files in directory /interface/inbound that are older than 60 days.
"-maxdepth 1" -> find files in current directory only. Don't look for files in sub directories.
After packing it in a shell script I got a request to delete "csv" files only. No problem... I added the "-name" to the find command:
find /interfaces/inbound -name "*.csv" -mtime +60 -type f -maxdepth 1 -exec rm {} \;
All csv files in /interface/inbound that are older than 60 days will be deleted.
But then, the request had changed, and I was asked to delete "*.xls" files further to "*.csv" files. At this point things went complicated for me since I'm not a shell script expert...
I tried several things, like add another "-name" to the find command:
find /interfaces/inbound -name "*.csv" -name "*.xls" -mtime +60 -type f -maxdepth 1 -exec rm {} \;
But no file was deleted. Couple of moments later I understood that I'm trying to find csv files which is also xls files... (logically incorrect of course).
After struggling a liitle with the find command, I managed to make it works:
find /interfaces/inbound \( -name "*.csv" -o -name "*.xls" \) -mtime +60 -type f -maxdepth 1 -exec rm {} \;
:-)
Aviad
Upgrade Java plug-in (JRE) to the latest certified version
If you have already migrated to Java JRE with Oracle EBS 11i you may want to update EBS to the latest update from time to time. For example, if your EBS environment is configured to work with Java JRE 6 update 5 and you want to upgrade your clients with the latest JRE 6 update 13.
This upgrade process is very simple:
- Download the latest Java JRE installation file
The latest update can be downloaded from here.
Download the "JRE 6 Update XX" under "Java SE Runtime Environment".
- Copy the above installation file to the appropriate directory:
$> cp jre-6uXX-windows-i586-p.exe $COMMON_TOP/util/jinitiator/j2se160XX.exe
We have to change the installation file name by the following format: "j2se160XX.exe" where XX indicates the update version.
- Execute the upgrade script:
$> cd $FND_TOP/bin
$> ./txkSetPlugin.sh 160XX
That's all....
Since we upgraded our system to JRE 6 update 13 (2 weeks ago), our users don't complain about mouse focus issues and some other forms freezes they have experienced before. So... it was worth it...
If you haven't migrated from Jinitiator to the native Sun Java plug-in yet, it's highly recommended to migrate soon. Jinitiator is going to be desupported soon.
See the following post for detailed, step by step, migration instructions: Upgrade from Jinitiator 1.3 to Java Plugin 1.6.0.x.
You are welcome to leave a comment.
Aviad
Corruption in redo log file when implementing Physical Standby
Lately I started implementing Data Guard - Physical Standby - as a DRP environment for our production E-Businsess Suite database and I must share with you one issue I encountered during implementation.
I chose one of our test environments as a primary instance and I used a new server, which was prepared to the standby database in production, as the server for the standby database in test. Both are Red-Hat enterprise linux 4.
The implementation process went fast with no special issues (at lease I thought so...), everything seems to work fine, archived logs were transmitted from the primary server to the standby server and successfully applied on the standby database. I even executed switchover to the standby server (both database and application tier), and switchover back to the primary server with no problems.
The standby database was configured for maximum performance mode, I also created standby redo log files and LGWR was set to asynchronous (ASYNC) network transmission.
The exact setting from init.ora file:
log_archive_dest_2='SERVICE=[SERVICE_NAME] LGWR ASYNC=20480 OPTIONAL REOPEN=15 MAX_FAILURE=10 NET_TIMEOUT=30'
At this stage, when the major part of the implementation had been done, I found some time to deal with some other issues, like interfaces to other systems, scripts, configure rsync for concurrent log files, etc... , and some modifications to the setup document I wrote during implementation.
While doing those other issues, I left the physical standby instance active so archive log files are transmitted and applied on the standby instance. After a couple of hours I noticed the following error in the primary database alert log file:
ARC3: Log corruption near block 146465 change 8181238407160 time ?
Mon Mar 2 13:04:43 2009
Errors in file [ORACLE_HOME]/admin/[CONTEXT_NAME]/bdump/[sid]_arc3_16575.trc:
ORA-00354: corrupt redo log block header
ORA-00353: log corruption near block 146465 change 8181238407160 time 02/03/2009 11:57:54
ORA-00312: online log 3 thread 1: '[logfile_dir]/redolog3.ora'
ARC3: All Archive destinations made inactive due to error 354
Mon Mar 2 13:04:44 2009
ARC3: Closing local archive destination LOG_ARCHIVE_DEST_1: '[archivelog_dir]/arch_[xxxxx].arc' (error 354)([SID])
Committing creation of archivelog '[archivelog_dir]/arch_[xxxxx].arc' (error 354)
ARCH: Archival stopped, error occurred. Will continue retrying
Mon Mar 2 13:04:45 2009
ORACLE Instance [SID] - Archival Error
I don't remember if I've ever had a corruption in redo log file before...
What is wrong?! Is it something with the physical standby instance ?? Actually, if it's something with the standby instance I would have expected for a corruption in the standby redo log files not the primary's..
The primary instance resides on a Netapp volume, so I checked the mount option in /etc/fstab but they were fine. I asked our infrastructure team to check if something went wrong with the network during the time I got the corruption, but they reported that there was no error or something unusual.
Ok, I had no choice but to reconstruct the physical standby database, since when an archive log file is missing, the standby database is out of sync'. I set the 'log_archive_dest_state_2' to defer so no further archive log will be transferred to the standby server, cleared the corrupted redo log files (alter database clear unarchived logfile 'logfile.log') and reconstruct the physical standby database.
Meanwhile (copy database files takes long...), I checked documentation again, maybe I missed something, maybe I configured something wrong.. I have read a lot and didn't find anything that can shed some light on this issue.
At this stage, the standby was up and ready. First, I held up the redo transport service (log_archive_dest_state_2='defer') to see if I'll get a corruption when standby is off. After one or two days with no corruption I activated the standby.
Then I saw the following sentence in Oracle® Data Guard Concepts and Administration 10g Release 2 (10.2):
"All members of a Data Guard configuration must run an Oracle image that is built for the same platform. For example, this means a Data Guard configuration with a primary database on a 32-bit Linux on Intel system can have a standby database that is configured on a 32-bit Linux on Intel system"
One moment, I thought to myself, the standby server is based on AMD processors and the primary server is based on Intel's.. Is it the problem?!
When talking about same platform, is the meaning same processors also? Isn't it sufficient to have same 32 bit OS on x86 machines?
Weird but I had to check it...
Meanwhile, I got a corruption in redo log file again which assured there is a real problem and it wasn't accidentally.
So I used another AMD based server (identical to the standby server) and started all over again – primary and standby instances. After two or three days with no corruption I started to believe the difference in the processors was the problem. But one day later I got a corruption again (Oh no…)
I must say that on the one hand I was very frustrated, but on the other hand it was a relief to know it's not the difference in the processors.
It was so clear that when I'll find out the problem it will be something stupid..
So it is not the processors, not the OS and not the network. What else can it be?!
And here my familiarity with the "filesystemio_option" initialization parameter begins (thanks to Oracle Support!). I don't know how I missed this note before, but all is written here - Note 437005.1: Redo Log Corruption While Using Netapps Filesystem With Default Setting of Filesystemio_options Parameter.
When the redo log files are on a netapp volume, "filesystemio_options" must be set to "directio" (or "setall"). When "filesystemio_options" is set to "none" (like my instance before), read/writes to the redo log files are using the OS buffer cache. Since netapp storage is based on NFS (which is stateless protocol), when performing asynchronous writing over the network, the consistency of writes is not guaranteed. Some writes can be lost. By setting the "filesystemio_options" to "directio", writes bypasses the OS cache layer so no write will be lost.
Needless to say that when I set it to "directio" everything was fine and I haven't gotten any corruption again.
Aviad
JRE Plug-in “Next-Generation” – Part II
In my last post "JRE Plug-in “Next-Generation” – to migrate or not?" I wrote about a Forms launching issue in EBS right after upgrading JRE (Java Plug-in) to version 6 update 11 which works with the new next-generation Java Plug-in architecture. The problem happens inconsistently and it only works when I disable the "next-generation Java Plug-in".
Following a SR I've opened to Oracle support about this issue, I was being asked to verify that the profile option "Self Service Personal Home Page Mode" is set to "Framework Only".
We have this profile option set to "Personal Home Page" as our users prefer this way to the "Framework Only" way.
It's important to note that "Personal Home Page" is not a supported value for the "Self Service Personal Home Page Mode" profile option and may cause unexpected issues.
After setting the profile option to "Framework Only" the problem has resolved and the screen doesn't freezes anymore.
So the solution in my case was to set the profile option "Self Service Personal Home Page Mode" to "Framework Only" (we are still testing it but it look fine so far), however there are two more options that seems to work, even when the profile option set to "Personal Home Page" and "next generation Java Plug-in" is enabled.
1) Uncheck "Keep temporary files on my computer"
- Navigate to Java console (start -> settings -> Control Panel -> Java, or start -> run -> javacpl.cpl)
- On General tab -> Temporary Internet Files -> Settings -> uncheck the "Keep temporary files on my computer".
- Check the issue from a fresh IE session.
I'm not sure how or why, but it solves the problem, no more freezing this way..
2) Set “splashScreen” to null
- Edit $FORMS60_WEB_CONFIG_FILE file in your Forms server node.
- Change this line
"splashScreen=oracle/apps/media/splash.gif"
to
"splashScreen="
- No need to bounce any service.
- Check the issue from a fresh IE session.
Again, it's not so clear how or why, but it solves the problem as well.
Now, we just need to convince our users to accept the "framework only" look and feel, and then we would consider upgrading all our clients to the new next-generation Java Plug-in.
You are welcome to leave a comment or share your experience with the new Java Plug-in.
Aviad
JRE Plug-in “Next-Generation” – to migrate or not?
It has been more than half a year since we've migrated from Oracle Jinitiator to Sun Java JRE Plug-in (Java 6 update 5) in our Oracle Applications (EBS) system, and I must say, I'm not satisfied yet.
For the first months we had been struggling with a lot of mouse focus bugs which have made our users very angry about this upgrade. Although we've applied some patches related to this bugs, we still have some with no resolution.
Upgrading to Developer 6i patchset 19 has solved some bugs but not all of them.
As part of an SR we had opened about mouse focus issue, we was advised by Oracle to install the latest Java JRE (Java 6 update 12 this days) as a possible solution for the remaining bugs.
Starting with Java 6 update 10, Sun has introduced the new "next-generation Java Plug-in", which makes troubles with Oracle EBS. You can read more about this new architecture at Sun Java site - "What is next-generation Java Plug-in".
Right after installing Java 6 update 11, I encountered a problem - when trying to open forms the screen freezes.
The browser window hangs inconsistently. I have no idea when it's going to be opened and when it's not. I've tried Java 6 update 12 and it's the same – sometimes it opens and sometimes it doesn’t. No matter what I did - clear java cache on client, clear Apache cache, install JRE in different directory (in case you have installed previous update of version 6), uninstall previous versions of Java Plug-in installed on same pc, I tried with explorer 6 and 7 - the problem wasn't resolved.
There is an unpublished opened bug for this problem: Bug 7875493 - "Application freezes intermittently when using JRE 6U10 and later". I've been told by Oracle support that they have some incompatibilities with the new next-generation architecture and that they are working with Sun about it.
Meanwhile there are 2 workarounds: (the second doesn't work for me but suggested by Oracle support)
1) Disable the "next generation Java Plug-in" option:
Go to Control Panel -> Java -> Select the "Advanced" tab -> expand the "Java Plug-in" -> uncheck the "Enable the next-generation Java Plug-in" option.
This workaround always works (at least for me...).
2) Set the swap file to system managed + Tune the heap size for java:
- Go to Control Panel -> System -> Select the "Advanced" tab -> click on Settings (in Performance frame) -> Select the "Advanced" tab -> Click on Change -> Select the "System managed size" option.
- Go to Control Panel -> Java -> Select the "Java" tab -> Click "View..." (in Java Applet Runtime Settings frame) -> update the "Java Runtime Parameters" field with: "-Xmx128m -Xms64m".
This workaround doesn't work for me.
For now, I've decided to stay with the "old" Java Plug-in 6 update 5 and do not upgrade our users to the new next-generation Java Plug-in. I Hope the following updates of Java Plug-in will be better or Oracle will publish a patch to solve this problem.
I’ll keep update as soon as I have more info’.
Aviad
How to enable trace for a CRM session
I was being asked to examine a performance issue within one of our CRM application screens, after some users complained about a specific long time action.
First thing, I tried to enable trace for the CRM session, but It turned out that it’s definitely not simple to identify a CRM session. Especially in my case, when a session opens two (sometimes more) database sessions. It’s quite impossible actually.
So how it is possible to trace those CRM sessions anyway?
Oracle has provided an option to execute custom code for every session opened in the database through a system profile. This profile called “Initialization SQL Statement - Custom” (the short name is 'FND_INIT_SQL') and allows customize sql/pl*sql code.
Once setting this profile in user level, each session opened for this user will first execute the code within the profile. No matter which type of activity the user does – Forms, CRM, Concurrent request, or anything else that opens a database session – the content of this profile will be executed.
So, clearly we can use this capability to enable Trace for users sessions.
Steps to enable trace for specific user:
- Login with “Application Developer” responsibility
- Open the “Create Profile” form –> Query the profile “FND_INIT_SQL”
- Switch responsibility to “System Administrator”
- Update the profile option value in user level to the following:
BEGIN FND_CTL.FND_SESS_CTL('','', '', 'TRUE','','ALTER SESSION SET TRACEFILE_IDENTIFIER='||''''||'AVIADE' ||''''||' EVENTS ='||''''||' 10046 TRACE NAME CONTEXT FOREVER, LEVEL 12 '||''''); END;
** Just replace AVIADE with the user you enable trace for.
- Now, after the user logout from the application (the user you enabled trace for), the user can login and reproduce the issue.
- When finish to reproduce the issue, you should disable the trace by clearing the profile option value and update it to NULL. (profile “Initialization SQL Statement – Custom” of course..)
- The trace file/s will wait for you in your udump (user_dump_dest init’ parameter) directory.
Since I enabled and disabled the trace quite a few times while investigating my performance issue, I wrote these handy simple programs which enable and disable the trace for a user in a quick and easy manner.
Execute this program to enable trace for a specific user: (substitute step 6 above)
DECLARE
l_ret boolean;
l_user_id number;
BEGIN
select user_id
into l_user_id
from fnd_user
where user_name = '&&USER_NAME';
l_ret := fnd_profile.SAVE(X_NAME => 'FND_INIT_SQL',
X_VALUE => 'BEGIN FND_CTL.FND_SESS_CTL('''','''','''', ''TRUE'','''',''ALTER SESSION SET TRACEFILE_IDENTIFIER=''||''''''''||''&&USER_NAME'' ||''''''''||'' EVENTS =''||''''''''||'' 10046 TRACE NAME CONTEXT FOREVER, LEVEL 12 ''||''''''''); END;',
X_LEVEL_NAME => 'USER',
X_LEVEL_VALUE => l_user_id);
commit;
dbms_output.put_line('Profile has updated successfully');
EXCEPTION
when others then
dbms_output.put_line('Failed to update the profile: '||sqlerrm);
END;
Execute this program to disable trace for a specific user: (substitute step 8 above)
DECLARE
l_ret boolean;
l_user_id number;
BEGIN
select user_id
into l_user_id
from fnd_user
where user_name = '&USER_NAME';
l_ret := fnd_profile.DELETE(X_NAME => 'FND_INIT_SQL',
X_LEVEL_NAME => 'USER',
X_LEVEL_VALUE => l_user_id);
commit;
dbms_output.put_line('Profile has erased successfully');
EXCEPTION
when others then
dbms_output.put_line('Failed to erase the profile: '||sqlerrm);
END;
Hope you find it helpful…
Feel free to leave a comment or share your thought about this issue.
Aviad
Oracle Database Resource Manager 11g - Undocumented New Parameters
I've played around with Oracle Database Resource Manager in 10g and it's quite nice and might be very useful for high CPU usage systems, but I found the inability to limit I/O as a drawback since in most cases I've faced the need to limit I/O is more necessary than CPU limit.
When you have, let's say, 8 CPU's on your machine, you need all the 8 to be 100% utilized by Oracle sessions for the resource manager start limit sessions. However, if your machine I/O capabilities are 50 mbps, you need only one or two sessions which perform intensive I/O (batch job/heavy report) to make the database very heavy.
In Oracle Database 11g Release 1, Resource Manager has gotten some new features related to I/O. So I've installed the 11g, made some tests and found some interesting issues.
I'm not going to write about Resource Manager basics or about 11g enhancements as some great articles have already been published about it. For example, you can read Tim's blog post - "Resource Manager Enhancements in Oracle Database 11g Release 1"
But... I'm going to discuss one missing capability (in my opinion) that will hopefully be available with Oracle Database 11g Release 2 with 2 new parameters which have already available but inactive and undocumented.
For those who are not familiar with Oracle Database Resource Manager I'll try to give a short basic introduction:
Oracle Database Resource Manager helps us to prioritize sessions to optimize resource allocation within our database by:
- Creating groups of sessions (Consumer Groups) based on similar resource requirements
- Allocate resources to those groups (Resource Plan Directive)
- Resource Plan - is a container of Resource Plan Directives that allocate resources to Consumer Groups
Only one Resource Plan is active at a time.
When Oracle Database 11g was introduced, some new features for Resource Manager related to I/O have been revealed. Among them:
- I/O Calibration -
New procedure which helps to assess the I/O capabilities of the database storage. The output of this procedure (CALIBRATE_IO) is max_iops, max_mbps and actual_latency.
- Per Session I/O Limits -
Unlike previous versions, you can limit I/O requests (or I/O MB) for a session before it moved to a new consumer group. (switch_io_megabytes and switch_io_reqs have been added to CREATE_PLAN_DIRECTIVE procedure)
Oracle have added the option to "capture" Oracle sessions by the I/O requests or by the megabytes of I/O they issued in order to move them to a lower priority consumer group.
I have a very fundamental doubt about this enhancements as I don't get the meaning of "capturing" an intensive I/O session and move it to a low priority consumer group which can have only CPU limit ... ?! The reason we "capture" this session is the amount of I/O it makes, and when we move it to a low priority consumer group we can just limit its CPU resources. We can't limit the amount of I/O for a Consumer Group.
It could have been very useful if Oracle had added the ability to limit I/O for a Consumer Group, like we can limit CPU (with mgmt_pN) for a Consumer Group. What is missing here is the ability to limit I/O for a specific Consumer Group in terms of Maximum I/O per second or Maximum megabytes per second.
Will Oracle enhance Resource Manager in 11g Release 2 to fulfill this capability?
I don't have a confident answer for this question but I assume they will.
While playing around I've noticed two new parameters to the CREATE_PLAN procedure - MAX_IOPS and MAX_MBPS. On first sight it looked like the answer to my question - the ability to limit I/O for session within a plan,
but it's not...
Those two parameter are undocumented and totally ignored in Oracle 11g Release 1 Documentation but available in 11g Release 1 database:
-- create a new resource plan
--
-- Input arguments:
-- plan - name of resource plan
-- comment - user's comment
-- cpu_mth - allocation method for CPU resources
-- (deprecated)
-- active_sess_pool_mth - allocation method for max. active sessions
-- parallel_degree_limit_mth - allocation method for degree of parallelism
-- queueing_mth - type of queueing policy to use
-- mgmt_mth - allocation method for CPU and I/O resources
-- sub_plan - whether plan is sub_plan
-- max_iops - maximum I/O requests per second
-- max_mbps - maximum megabytes of I/O per second
--
PROCEDURE create_plan(plan IN VARCHAR2,
comment IN VARCHAR2,
cpu_mth IN VARCHAR2 DEFAULT NULL,
active_sess_pool_mth IN VARCHAR2
DEFAULT 'ACTIVE_SESS_POOL_ABSOLUTE',
parallel_degree_limit_mth IN VARCHAR2 DEFAULT
'PARALLEL_DEGREE_LIMIT_ABSOLUTE',
queueing_mth IN VARCHAR2 DEFAULT 'FIFO_TIMEOUT',
mgmt_mth IN VARCHAR2 DEFAULT 'EMPHASIS',
sub_plan IN BOOLEAN DEFAULT FALSE,
max_iops IN NUMBER DEFAULT NULL,
max_mbps IN NUMBER DEFAULT NULL
);
I tried to create a new plan using one of these two parameters, but it returned an error for each value I tried.
It turned out that the only valid value to MAX_IOPS and MAX_MBPS is null.
begin
dbms_resource_manager.create_plan(plan => 'PLAN_EX_1'
,comment => 'Plan Example 1'
,max_iops => 100);
end;
/
begin
*
ERROR at line 1:
ORA-29355: NULL or invalid MAX_IOPS argument specified
ORA-06512: at "SYS.DBMS_SYS_ERROR", line 86
ORA-06512: at "SYS.DBMS_RESOURCE_MANAGER", line 38
ORA-06512: at line 2
I've confirmed it with Oracle support and their answer was:
"This is currently an expected behaviour, we can not explicitly set either max_iops or max_mbps to any value other than null, that's why these parameters are currently not included in the documentation."
So here is my guess:
It looks like Oracle are going to enhance Resource Manager to allow I/O limit, but unlike CPU limit through Plan Directive (mgmt_pN), it's going to be a limit in Plan level, so you can create a sub plan with limited I/O resources allocated. Maybe the allocation method parameter (mgmt_mth) will get more valid options except for EMPHASIS and RATIO.
I'll keep track of it as soon as Oracle Database 11g Release 2 will be announced and I'll update.
You are welcome to leave a comment and/or share your opinion about this topic.
Aviad
Developer 6i Patch Set 19 upgrade with EBS 11i
It has been more than two years since the last Developer 6i patchset 18 was certified with Oracle E-Business Suite Release 11i, and now, Developer 6i patchset 19 (6.0.8.28) is certified with Oracle Apps 11i.
Actually, since we migrated from Jinitiator to Java JRE 1.6, we've encountered some frustrating mouse focus issues, I really hope they were fixed with this patch and won't appear after upgrade.
Like with the last patch set, I'll bring you "step-by-step" upgrade instructions for linux deployments.
Other Operation Systems's need another patches - see Note 125767.1 - Upgrading Developer 6i with Oracle Applications 11i.
*** All patches must be installed on all Application tier nodes
- Stop all application processes by adstpall.sh
- Apply the latest certified Developer 6i patch set 19 (6194129)
- Source applications environment (e.g source .../testappl/APPSORA.env)
- Verify that $ORACLE_HOME is the 806_ORACLE_HOME
- Execute with applmgr user
$ unzip p6194129_60828_LINUX.zip
$ cd developer6i_patch19
$ ./patch_install.sh 2>&1 | tee patch_install_p19.log
- Check patch_install_p19.log for any errors
- Execute the following to relink Procedure Builder, Forms, Graphics and Reports
$ cd $ORACLE_HOME/procbuilder60/lib; make -f ins_procbuilder.mk install
$ cd $ORACLE_HOME/forms60/lib; make -f ins_forms60w.mk install
$ cd $ORACLE_HOME/graphics60/lib; make -f ins_graphics60w.mk install
$ cd $ORACLE_HOME/reports60/lib; make -f ins_reports60w.mk install - Apply patch 7156414
- Unzip patch file $ unzip p7156414_60828_GENERIC.zip
- Backup old files $ cp -r $ORACLE_HOME/forms60/java/oracle/forms/handler/UICommon.class $ORACLE_HOME/forms60/java/oracle/forms/
handler/UICommon.class.PRE_BUG7156414
$ cp -r $ORACLE_HOME/forms60/java/oracle/forms/handler/ComponentItem.class $ORACLE_HOME/forms60/java/oracle/forms/
handler/ComponentItem.class.PRE_BUG7156414
$ cp -r $ORACLE_HOME/forms60/java/oracle/forms/handler/BlockScroller.class $ORACLE_HOME/forms60/java/oracle/forms/
handler/BlockScroller.class.PRE_BUG7156414
$ cp -r $ORACLE_HOME/forms60/java/oracle/forms/handler/FormCanvas.class $ORACLE_HOME/forms60/java/oracle/forms/
handler/FormCanvas.class.PRE_BUG7156414
$ cp -r $ORACLE_HOME/forms60/java/oracle/forms/handler/FormWindow.class $ORACLE_HOME/forms60/java/oracle/forms/
handler/FormWindow.class.PRE_BUG7156414
$ cp -r $ORACLE_HOME/forms60/java/oracle/forms/ui/VBean.class $ORACLE_HOME/forms60/java/oracle/forms/
ui/VBean.class.PRE_BUG7156414
- Copy patch files to appropriate directories $ cd [PATCH_TOP]/7156414/oracle/forms/handler
$ cp UICommon.class $ORACLE_HOME/forms60/java/oracle/forms/handler/UICommon.class
$ cp ComponentItem.class $ORACLE_HOME/forms60/java/oracle/forms/handler/ComponentItem.class
$ cp BlockScroller.class $ORACLE_HOME/forms60/java/oracle/forms/handler/BlockScroller.class
$ cp FormCanvas.class $ORACLE_HOME/forms60/java/oracle/forms/handler/FormCanvas.class
$ cp FormWindow.class $ORACLE_HOME/forms60/java/oracle/forms/handler/FormWindow.class$ cd [PATCH_TOP]/7156414/oracle/forms/ui
$ cp VBean.class $ORACLE_HOME/forms60/java/oracle/forms/ui/VBean.class
- Regenerate Jar files
- Execute adadmin
- Select the "Generate Applications Files menu" option
- Select "Generate product JAR files"
- Do you wish to force regeneration of all jar files? => Yes
- Spot check that the JAR files have been generated by verifying the timestamp $ cd $OA_JAVA/oracle/apps/fnd/jar
$ ll fndforms.jar fndewt.jar - Apply patch 6125732
- Unzip patch file + Apply patch
$ unzip p6125732_60828_LINUX.zip
$ cd 6125732
$ sh patch.sh - Apply patch 6857221
- Unzip patch file + Apply patch
$ unzip p6857221_60828_LINUX.zip
$ cd 6857221
$ sh patch.sh
- Relink f60webmx for Oracle Applications
$ adrelink.sh force=y "fnd f60webmx" - Apply patch 3830807
- Unzip patch file + Apply patch
$ unzip p3830807_8063_LINUX.zip
$ cd 3830807
$ ./patch.sh
- Relink all Applications executables:
adadmin -> "Maintain Applications Files" -> "Relink Applications programs"
- Apply patch 4586086
- Unzip patch file
$ unzip p4586086_600_LINUX.zip
- Backup old file $ cd $ORACLE_HOME/forms60/lib
$ mv env_forms60.mk env_forms60.mk.PRE_BUG4586086
- Copy patch file to the appropriate directory
$ cd [PATCH_HOME]/bug4586086
$ cp env_forms60.mk $ORACLE_HOME/forms60/lib
- Generate shared object + Relink f60webmx for apps
$ cd $ORACLE_HOME/forms60/lib
$ make -f cus_forms60w.mk libso_install
$ adrelink.sh force=y "fnd f60webmx" - Relink applications executables
- Run adadmin
- Select (2) "Maintain Applications Files Menu"
- Select (1) "Relink Applications programs"
- List of product to link: fnd
- Generate specific executables …: Yes
- Relink with debug: No
- Enter executables to relink: f60webmx ar60run ar60runb ar60rund
- Apply patch 7343387 (Apps Interoperability)
- Unzip patch file
$ unzip p7343387_11i_GENERIC.zip
- Enable maintenance mode: adadmin -> (5) Change Maintenance Mode -> (1) Enable Maintenance Mode
- apply patch with adpatch
- Disable maintenance mode: adadmin -> (5) Change Maintenance Mode -> (2) Disable Maintenance Mode
- Verify your upgrade
- Check the timestamp for the following files: $ cd $OA_JAVA/oracle/apps/fnd/jar
$ ll fndforms.jar fndewt.jar
If the timestamp is not current - run adadmin => Maintain Applications Files => Generate Product JAR Files.
- Start all applications processes (adstrtall.sh)
- You can also verify your upgrade by login to forms responsibility -> Help -> About Oracle Applications
You should see: Oracle Forms version : 6.0.8.28.0
Related - Note 125767.1 - Upgrading Developer 6i with Oracle Applications 11i.
You are welcome to leave a comment
How to enable SSL for Agile Proxy server
Following the last post about Agile PLM - Web Proxy Server Installation, in this post I'll show how to enable SSL for Agile Proxy server to make Web access to Agile more secure.
Apply the SSL certificate
- Have a signed SSL certificate file (.pfx file) from a Well-known Certificate Authorities (such as VeriSign)
- Login to the Agile Proxy server with administrator user
- Navigate to: Start -> Administrative Tools -> Internet information services (IIS) Manager
- Right click on Agile PLM Web Site -> properties -> Select the Directory Security tab
- Click on Server Certificate -> next
- Select Import a certificate from a .pfx file -> next
- Enter Path and file name of the certificate file (.pfx file) -> next
- Enter the password for the certificate -> next
Update the iFS_External File Manager
- Open the Agile Java Client
- Select 'Admin' Tab -> expand 'Server Settings' -> open 'Locations'
- Select the 'File Manager' tab -> Double click on the iFS_External file manager.
- Update the File Manager URL from http://... to -> https://...
Now you can login to Agile through the Agile Proxy server via https://servername.domain/Agile/PLMServlet.
When you'll try to work with files (get file or add new) you might encounter the following error:
"The preferred file server : https://servername.domain/Filemgr/AttachmentServlet for user : UserName is down. Please contact the system administrator."
You'll although see the following error within OC4J~home~defaulet~island~1 (at [OASHome]/opmn/logs):
08/09/23 10:23:11 javax.net.ssl.SSLHandshakeException: sun.security.validator.ValidatorException: No trusted certificate found
08/09/23 10:23:11 at com.sun.net.ssl.internal.ssl.BaseSSLSocketImpl.a(DashoA12275)
08/09/23 10:23:11 at com.sun.net.ssl.internal.ssl.SSLSocketImpl.a(DashoA12275)
08/09/23 10:23:11 at com.sun.net.ssl.internal.ssl.SSLSocketImpl.a(DashoA12275)
08/09/23 10:23:11 at com.sun.net.ssl.internal.ssl.SunJSSE_az.a(DashoA12275)
.....
.....
The reason for this error is the certificate for root authority that is not installed on the OAS.
The solution is to import Root CA certificate in the JDK embedded inside OAS:
- Open a web browser and access the Agile web client via https://...
- Double click on the padlock in the lower right corner of the browser window
- Select Details and then select the "Copy to File" button
- Answer the prompts using the defaults and select a filename for the .cer file.
- Open a command window (Start -> Run -> cmd)
- Navigate to the [OASHome]\jdk\bin directory
- Type the following command:
keytool -import -keystore [OASHome]\jdk\jre\lib\security\cacerts -file c:\temp\AgileProxy.cer -
When prompted for the Certificate store password type changeit and then hit Enter
-
When prompted to load the certificate, type yes and hit enter
-
Restart OAS
You are welcome to leave a comment..
Aviad
Agile PLM - Web Proxy Server Installation
It has been a while since I've posted about Agile PLM stuff..
In this post I'll go through implementing and configuring an Oracle Agile PLM Web Proxy Server.
Previous related posts:
Agile PLM 9.2.2.1 - Part I - Introduction
Agile PLM 9.2.2.1 – Part II – Database Node Installation
Agile PLM 9.2.2.1 – Part III – Application Node Installation
First, who needs a Web Proxy server for Agile PLM?
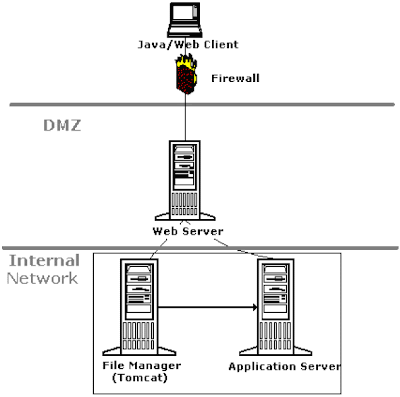
In order to make Agile PLM accessible to external users, a Web Proxy server should be installed to allow connections from the internet.
This solution include a new server on DMZ behind a firewall which forwards calls to the internal Agile application server.
(* Image from Oracle Agile documentation)
The Agile Web Proxy Server installation consists of the following steps:
- Installing and Configuring the IIS
- Install the Agile Web proxy files on the IIS server in the DMZ
- Configuring IIS as a Proxy Server for Agile PLM
- Configuring IIS as a Proxy Server for Agile File Manager
- Create new external File Manager
Now I'll show a detailed procedure to install Agile Web Proxy Server on Windows using IIS (Microsoft Internet Information Server).
*** When installing on Unix/Linux OS you'll use Apache as the web proxy server.
Installing and Configuring the IIS
- Install IIS on the new Agile Proxy Server (will be called agiledmz)
- Login to agiledmz server with administrator user
- Navigate to: Start -> Administrative Tools -> Internet information services (IIS) Manager
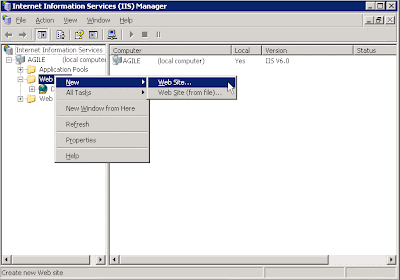
- Right click on Web Sites -> new -> Web Site -> Next

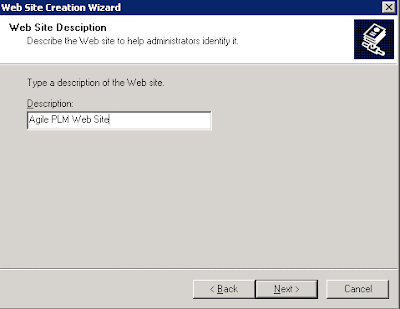
- Enter description: Agile PLM Web Site -> Next
- Enter the following:
Ip: All unussigned
port: 80
host: null -> Next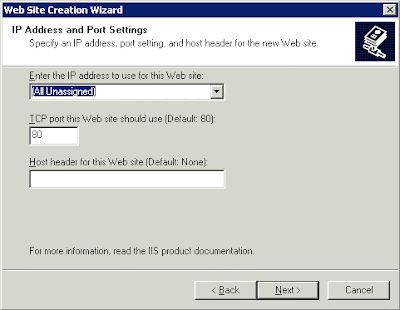
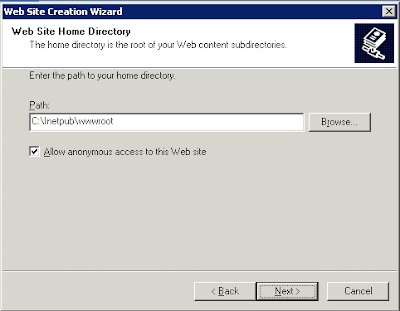
- Path: C:\Inetpub\wwwroot -> Next
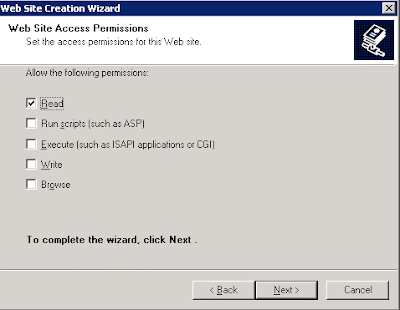
- Check the Read option only -> Next
- Click Finish
- Right click on Agile PLM Web Site -> properties
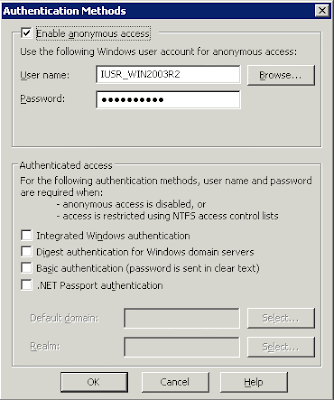
- Select tab Directory Security -> Under 'Authentication and Access Control' click on Edit -> Uncheck the 'Integrated Windows authentication'
- Disable the default Web Site: Right Click on Defaule Web Site -> Stop
Install the Agile Web proxy files on the IIS server in the DMZ
- Make sure IIS is up and running (Go to services screen - services.msc - and check that "IIS Admin Service" process is in Started state)

- Execute setup.exe from [INSTALLATION_BASE_DIR]\PN00168\Windows directory
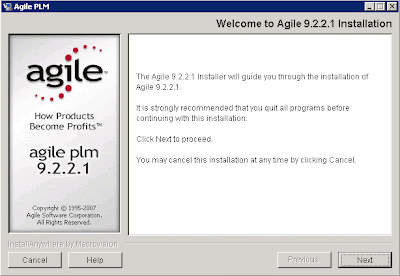
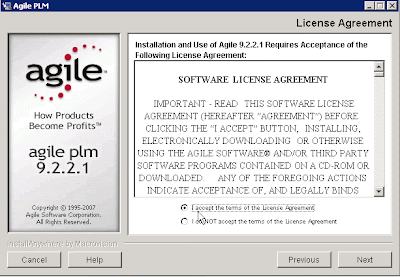
- Click Next -> accept the license -> Next
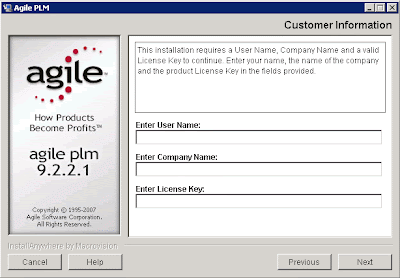
- Enter User name, Company name and License key -> Next
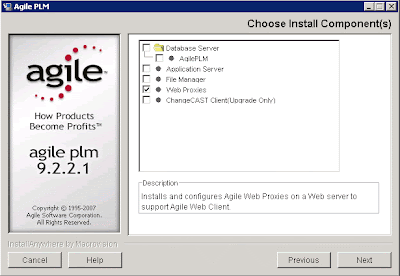
- Check the Web Proxies only -> Next
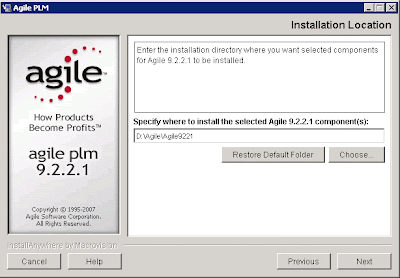
- Specify directory on which agile files will be installed (D:\Agile\Agile9221)-> Next
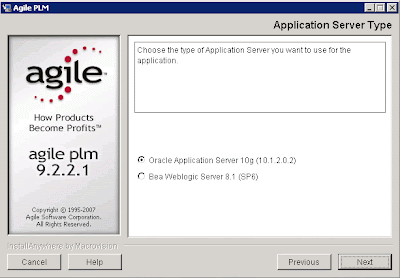
- Select Oracle Application Server 10g -> Next
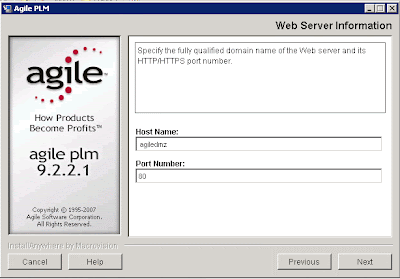
- Enter the Web Proxy server name (or IP) and port (80) -> Next
- Enter the server name and port on which Agile application is installed (The Agile Application Server) -> Next

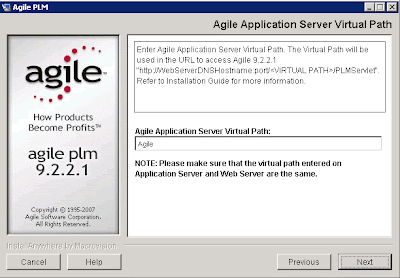
- Keep the default "Agile" for Agile Application Server Virtual Path-> Next
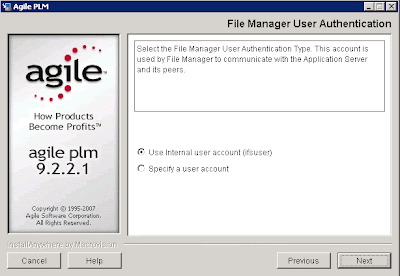
- Keep the default "Use internal user account (ifsuser)" -> Next
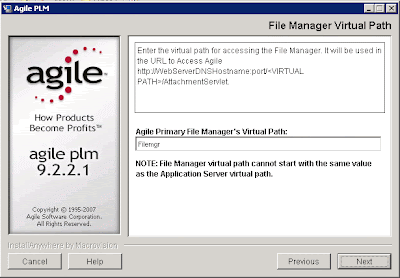
- Keep the default "Filemgr" for Agile Primary File Manager’s Virtual Path -> Next
- Enter Agile's File Manager host name and port (might be the same as Agile Application Server)-> Next

- Click on Install
- Click on Done
Configuring IIS as a Proxy Server for Agile PLM
- Navigate to: Start > Administrative Tools > Internet Information Services (IIS) Manager
- Right click on Agile PLM Web Site -> properties
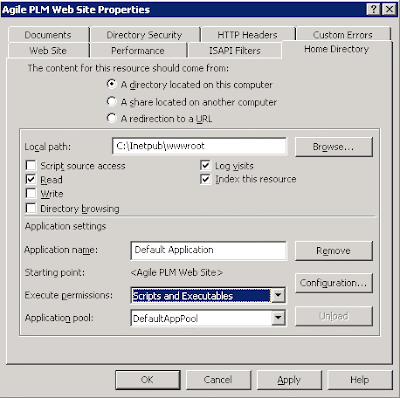
- Click the Home Directory tab -> update the execute permissions to Scripts and Executables
- Click the ISAPI Filter tab -> click Add
- Filter name: oproxy , Executable: D:\Agile\Agile9221\AgileProxies\oracle_proxy.dll -> Ok -> Ok

- Right click on Agile PLM Web Site -> New -> Virtual Directory -> Next
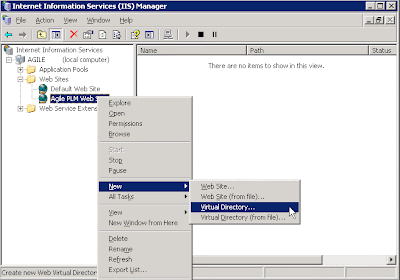
- Alias: oproxy -> Next
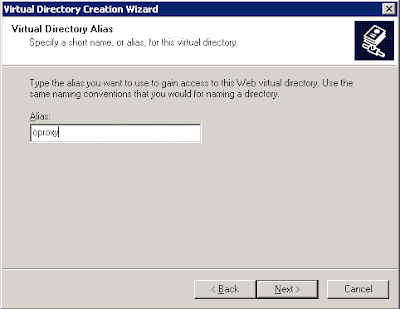
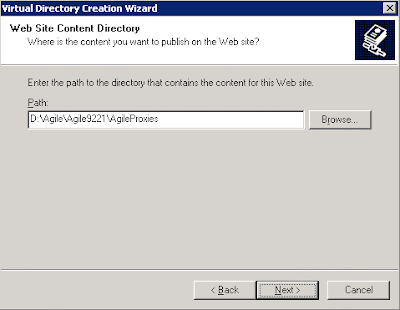
- Path: D:\Agile\Agile9221\AgileProxies -> Next
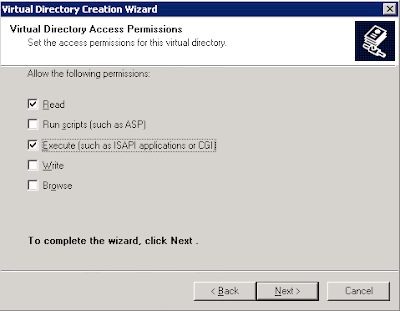
- Check the Read and Execute -> Next -> Finish
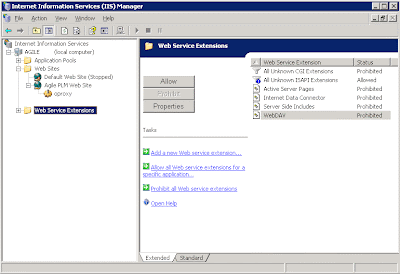
- Select the Web Service Extensions -> Select the All Unknown ISAPI Extensions -> Click Allow -> Click Yes
- Close IIS Manager window
- Restart IIS from services screen
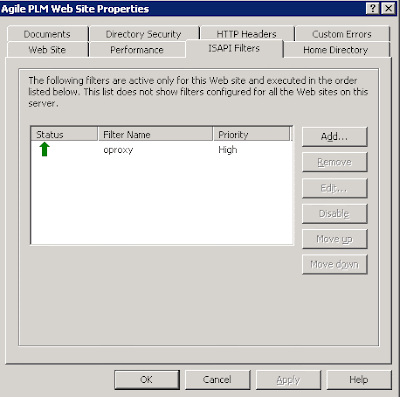
- Right Click on Agile PLM Web Site -> properties -> select the ISAPI Filters tab -> you should see a green arrow pointing up for oproxy.
Configuring IIS as a Proxy Server for Agile File Manager
- Login to the File Manager server
- Note the Connector Port number from [AGILE_HOME]\Tomcat\conf\server.xml
<!-- Define a Coyote/JK2 AJP 1.3 Connector on port 8009 -->
<Connector port="8009" enableLookups="false" redirectPort="8443" debug="0" protocol="AJP/1.3"/> -
Edit jk2.properties from [AGILE_HOME]\Tomcat\conf
Add the following line at the end and save the file:
channelSocket.port=8009 - Login to agiledmz - (The Web Proxy Server)
- Navigate to: Start > Administrative Tools > Internet Information Services (IIS) Manager
- Right click on Agile PLM Web Site -> properties
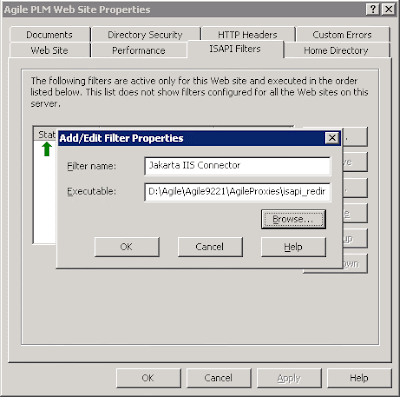
- Click the ISAPI Filter tab -> click Add
- Filter name: Jakarta IIS Connector , Executable: D:\Agile\Agile9221\AgileProxies\isapi_redirect.dll -> Ok -> Ok
- Right click on Agile PLM Web Site -> New -> Virtual Directory -> Next

- Alias: Jakarta -> Next
- Path: D:\Agile\Agile9221\AgileProxies -> Next
- Check the Read and Execute -> Next -> Finish

- Open the workers.properties file in [AGILE_HOME]\AgileProxies and make sure the File Manager server is correct in the following entry:
worker.ajp13w.host=<File Manager host name> - Restart IIS
- Right Click on Agile PLM Web Site -> properties -> select the ISAPI Filters tab -> you should see green arrows pointing up for both oproxy and jakarta.

Create new external File Manager
- Open the Agile Java Client
- Select 'Admin' Tab -> expand 'Server Settings' -> open 'Locations'
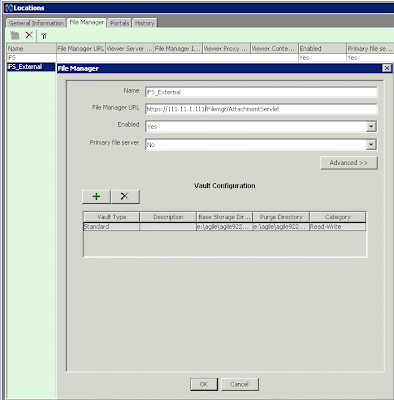
- Select the 'File Manager' tab -> click on the 'new' icon (you must have license for unlimited File Managers to enable it)
- Enter the following:
Name - iFS_External
File Manager URL - Use the web proxy server name (registered on the web) or IP, e.g. http://agile.company.domain/Filemgr/AttachmentServlet or http://111.11.11.111/Filemgr/AttachmentServlet
Enabled - Yes
Primary File Server - No
- Click on 'Ok'
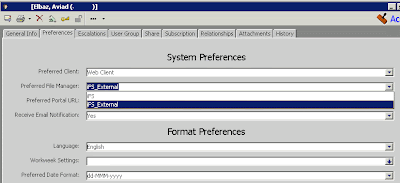
- Expand the 'User Settings' -> open 'Users' -> find the user you want to use the external iFS and open his settings -> select the 'Preferences' tab -> update the 'Preferred File Manager' to 'iFS_External'.
*** Important Note
Agile architecture compels you to configure specific File Manager for each user.
Users configured to use the internal iFS will be able to utilize the File Manager from within the network only! They'll be unable to utilize the external iFS when login to Agile through the Agile Web Proxy Server.
The same behaviour for users configured to use the external iFS - They will be able to utilize the external iFS only.
Now you can login to agile from the internet through the Agile Web Proxy Server.
Use the following URL to get the login screen:
http://[Agile Web Server Proxy IP or Name]/Agile/PLMServlet
Next post I'll show how to secure connections to Agile through the Proxy server using SSL (https) connection.
You are welcome to leave a comment and/or share your experience with Agile installation.
Aviad
Oracle Transparent Gateway for MS SQL Server - Part II
Following my last post about Oracle Transparent Gateways which was theoretical post, this post will be more practical.
In this post I'll show an example of configuring Oracle Transparent Gateway for MS SQL Server.
The goal is to make it possible to retrieve data from MS SQL server database by querying from Oracle database.
The steps are:
- install Oracle Transparent Gateway for MS SQL Server (not explained here)
- Configure the gateway initialization parameter file
- Configure the listener
- Configure the Oracle database tnsnames.ora
- Creating DB link from Oracle database to MS SQL Server
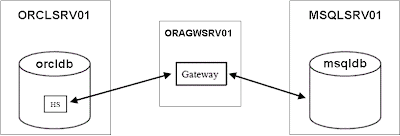
In my environment there are 3 servers involved:
- Oracle database server - name: orclsrv01, with Oracle database installed name: orcldb
- Microsoft SQL server - name: msqlsrv01, with MS SQL server installed name: msqldb
- Oracle Gateway server - name: oragwsrv01, with Oracle Transparent Gateway installed.
Configure the gateway initialization parameter file
After Oracle Transparent Gateway for MS SQL server installed on ORAGWSRV01 server, a new default initialization file is created at: $ORACLE_HOME\tg4msql\admin\inittg4msql.ora.
$ORACLE_HOME - is the directory where Transparent Gateway installed.
inittg4msql.ora - is the default initialization parameter file, as tg4msql represents the Gateway SID.
If you choose to not use the default SID (or when you have more than one MS Sql server to connect to), the initialization parameter file should be named as follow: init[GW_SID].ora
Edit the inittg4msql.ora file and specify the MS Sql Server connection details as follow:
HS_FDS_CONNECT_INFO=server_name.database_name
in our case:
HS_FDS_CONNECT_INFO=msqlsrv01.msqldb
Alternatively you can set it as follow:
HS_FDS_CONNECT_INFO="SERVER=msqlsrv01; DATABASE=msqldb"
Configure the listener
In order to make the listener work with the gateway we should configure it.
The listener have to be on the same server like the Gateway.
We should edit the listener.ora within the Oracle home on which the Gateway installed.
The listener.ora must have at least 2 entries:
- The address to listen on
- the Gateway to start
On ORAGWSRV01 server at $ORACLE_HOME\network\admin edit the listener.ora as follow:
LISTENER=
(ADDRESS=
(PROTOCOL=TCP)
(HOST=host_name)
(PORT=port_number))
SID_LIST_LISTENER=
(SID_LIST=
(SID_DESC=
(SID_NAME=gateway_sid)
(ORACLE_HOME=oracle_home)
(PROGRAM=tg4msql)
)
)
Where:
host_name - is the server name on which the gateway is installed
port_number - is the listener port
gateway_sid - is the gateway SID (default is tg4msql)
oracle_home - is the Oracle directory on which the gateway is installed
In our case:
LISTENER=
(ADDRESS=
(PROTOCOL=TCP)
(HOST=oragwsrv01)
(PORT=1521))
SID_LIST_LISTENER=
(SID_LIST=
(SID_DESC=
(SID_NAME=tg4msql)
(ORACLE_HOME=C:\oracle\product\10.2.0)
(PROGRAM=tg4msql)
)
)
After finishing the Gateway configuration, restart the listener (lsnrctl stop; lsnrctl start).
Configure the Oracle database tnsnames.ora
Now, when the Gateway configured, we need to configure the Oracle database server to communicate with the Gateway via Oracle Net services.
On ORCLSRV01 server at $TNS_ADMIN ($ORACLE_HOME/network/admin) edit the tnsnames.ora file and add the Gateway's connect descriptor as follow:
connect_descriptor=
(DESCRIPTION=
(ADDRESS=
(PROTOCOL=TCP)
(HOST=host_name)
(PORT=port_number)
)
(CONNECT_DATA=
(SID=gateway_sid))
(HS=OK))
Where:
connect_descriptor - you can specify a name which will be used later when we create a db link
host_name - is the server on which the Gateway installed
port_number - is the port used by the listener that listening for the Gateway
gateway_sid - is the gateway SID (default tg4msql)
HS=OK - indicates this connect descriptor is using heterogeneous Services
In our case:
mytg4msql=
(DESCRIPTION=
(ADDRESS=
(PROTOCOL=TCP)
(HOST=oragwsrv01)
(PORT=1521)
)
(CONNECT_DATA=
(SID=tg4msql))
(HS=OK))
Creating DB link from Oracle database to MS SQL Server
Now, when all configurations were done, we only need to create a Database Link from Oracle to the Gateway.
Connect to orcldb database and create a db link as follow:
create database link ORCLDB2MSQLDB
connect to [MSQLUSER] identified by [MSQLPWD]
using 'mytg4msql';
Where MSQLUSER & MSQLPWD are the user name and password to connect to the MS SQL server.
Test it...
At this stage we can get data from MS SQL Server via Oracle Database as if we query from Oracle database.
For example, if we have a RESERVATIONS table in MSQLDB, we can retrieve RESERVATIONS rows from ORCLDB by issuing the following SQL statement:
select *
from reservations@ORCLDB2MSQLDB;
For more information about Transparent Gateway for Microsoft SQL Server:
Oracle® Transparent Gateway for Microsoft SQL Server Administrator's Guide 10g Release 2 (10.2) for Microsoft Windows (32-bit)
For more information about other Transparent Gateways for other Database systems:
Oracle Database Documentation Library 10g release 2 (10.2) - Information Integration
You are welcome to leave a comment.
Aviad
How to Configure OEM 10g Database Control after Clone
After cloning an EBS environment I had tried to start the OEM 10g Database Control (DBConsole) and I got this message:
[oratest@testsrv1 ~]$ emctl start dbconsole
TZ set to Israel
OC4J Configuration issue.
/oracle/test/db/testdb/10.2/ oc4j/j2ee/OC4J_DBConsole_testsrv1.domain_TEST not found.
However, it was an acceptable message since DB Console wasn't configured to this instance yet.
Using emca I've tried to recreate the DB Control configuration files as follow:
[oratest@testsrv1 ~]$ emca -config dbcontrol db
...
INFO: Database Control started successfully
...
INFO: >>>>>>>>>>> The Database Control URL is http://testsrv1.domain:5500/em <<<<<<<<<<<
Enterprise Manager configuration completed successfully
Well, I thought it looks fine, but when I opened the DB Console I saw this message at the top of the page:
error:
java.lang.Exception: Exception in sending Request :: null
After some research, logs digging and Metalink searches, I found that the Agent component should be relinked manually.
But before there are two issues in env_sysman.mk file that should be fixed before executing the relink command.
I will show my actions step by step:
- Stop DB Console:
emctl stop dbconsole
- cd $ORACLE_HOME/sysman/lib
- Edit env_sysman.mk and look for "JRE_LIB_DIR"
In my instance JRE_LIB_DIR was populated with the old environment name..
I changed it from:
JRE_LIB_DIR=/oracle/prod/db/proddb/10.2/jdk/jre/lib/i386
To:
JRE_LIB_DIR=/oracle/test/db/testdb/10.2/jdk/jre/lib/i386
- One more issue for env_sysman.mk, look for "$(LIBNMEM) $(LIBNMER)"
And change from:
$(LIBNMEM) $(LIBNMER) \
To:
$(LIBNMEM) $(LIBNMER) $(LIBNMO) \
- Now relink the Agent component by issuing this command:
make -f ins_sysman.mk agent
- Recreate the DB Control configuration files (Again, even if you did it before)
emca -config dbcontrol db
Following this procedure will make the DBConsole configured and work for the new cloned instance.
How to enable FND_HELP search by creating an index on FND_LOBS efficiently
Have you ever tried to use the search option of Online Help in Oracle Applications?
Our users did... and they got "The page cannot be found" message...
I checked it on firefox, hope to get more accurate message, and I got this:
"Not Found. The requested URL /pls/DEV/fnd_help.search was not found on this server".
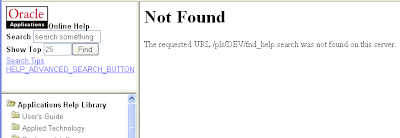
I checked fnd_help package and it's compiled and looks fine.
These errors appeared in error_log_pls:
[Mon Jul 28 10:34:54 2008] [warn] mod_plsql: Stale Connection due to Oracle error 20000
[Mon Jul 28 10:34:54 2008] [error] mod_plsql: /pls/DEV/fnd_help.search ORA-20000
ORA-20000: Oracle Text error:
DRG-10599: column is not indexed
ORA-06512: at "SYS.DBMS_SYS_SQL", line 1209
ORA-06512: at "SYS.DBMS_SQL", line 328
ORA-06512: at "APPS.FND_HELP", line 1043
ORA-06512: at "APPS.FND_HELP", line 873
ORA-06512: at line 20
I found note 306239.1 - "Cannot Search Online Help After Fresh Install of 11.5.10" which suggest that Applications interMedia Text indexes are corrupt. In my instance it even wasn't exist...
I followed this note which instructs to:
- drop index FND_LOBS_CTX;
- Rebuild the index using aflobbld.sql
But aflobbld.sql had been running for more than 10 hours and the size of DR$FND_LOBS_CTX$I table has reached to 35 GB !
I had been wondering how it can be that fnd_lobs table is less than 1GB and the index on it is 35 GB and counting.... ?!
Note 396803.1 - "FND_LOBS_CTX is having huge size, how to reduce the sizeof the index?" suggests it's a bug, indexing all documents in FND_LOB table, also the binary files, while using wrong filter.
So how can we make aflobbld.sql to index only FND_HELP documents?
For each row in FND_LOBS table the file_format column is populated with one of the following values: IGNORE, BINARY, TEXT.
aflobbld.sql will index only rows that have this column set to BINARY or TEXT.
If we set all rows to IGNORE except FND_HELP rows, we could index them only.
Note 397757.1 - "How to Speed Up Index Creation on FND_LOBS by indexing Only FND_HELP Data" suggests the steps to do it.
These are the steps:
- Backup the fnd_lobs table before updating it, we will use it later:
create table fnd_lobs_bk as select * from fnd_lobs;
** you can create a backup of this table and omit the file_date column to make this backup faster
- Drop index FND_LOBS_CTX if exists:
drop index applsys.FND_LOBS_CTX;
- Update all rows to IGNORE except FND_HELP rows:
update fnd_lobs
set file_format = 'IGNORE'
where nvl(program_name,'@') <> 'FND_HELP' ;
- Execute aflobbld.sql from OS terminal:
sqlplus apps/sppas @$FND_TOP/sql/aflobbld.sql applsys apps;
- Since I'm not sure about the impact of leaving the FND_LOBS rows as IGNORE, I updated them back to the previous state:
create unique index fnd_lobs_bk_u1 on fnd_lobs_bk (file_id);
update (select fl.file_format ffo,flb.file_format ffb
from fnd_lobs fl
,fnd_lobs_bk flb
where fl.file_id = flb.file_id)
set ffo=ffb;
drop table fnd_lobs_bk;
- Check the search option.... it should work now.
You are welcome to leave a comment .
Aviad
How to execute TKPROF on trace files larger than 2GB ? --> Use pipe
Here is a nice trick to work with files larger than 2GB on Unix/Linux using pipe.
First case - TKPROF
When trying to execute TKPROF on a trace file larger than 2 GB I got this error:
[udump]$ ll test_ora_21769.trc
-rw-r----- 1 oratest dba 2736108204 Jun 23 11:04 test_ora_21769.trc
[udump]$ tkprof test_ora_21769.trc test_ora_21769.out
TKPROF: Release 9.2.0.6.0 - Production on Thu Jun 23 21:05:10 2008
Copyright (c) 1982, 2002, Oracle Corporation. All rights reserved.
could not open trace file test_ora_21769.trc
In order to successfully execute TKPROF on this trace file you can use the mkfifo command to create named pipe as follow:
- Open a new unix/linux session (1st), change directory where the trace file exists and execute:
[udump]$ mkfifo mytracepipe
[udump]$ tkprof mytracepipe test_ora_21769.out
TKPROF: Release 9.2.0.6.0 - Production on Thu Jun 23 21:07:35 2008
Copyright (c) 1982, 2002, Oracle Corporation. All rights reserved.
- Open another session (2nd), change directory where the trace file exists and execute:
[udump]$ cat test_ora_21769.trc > mytracepipe
This way you'll successfully get the output file.
Second case - spool
Similar issue with spool to file larger than 2GB can be treat similarly.
$ mkfifo myspoolpipe.out
--> Create new named pipe called 'myspoolpipe.out'
$ dd if=myspoolpipe.out of=aviad.out &
--> What you read from 'myspoolpipe.out' write to 'aviad.out'
$ sqlplus user/pwd@dbname
SQL*Plus: Release 9.2.0.6.0 - Production on Tue Jun 24 12:05:37 2008
Copyright (c) 1982, 2002, Oracle Corporation. All rights reserved.
Connected to:
Oracle9i Enterprise Edition Release 9.2.0.6.0 - Production
With the Partitioning, OLAP and Oracle Data Mining options
JServer Release 9.2.0.6.0 - Production
SQL> spool myspoolpipe.out
--> Spool to the pipe
SQL> select .....
SQL> spool off
SQL> 5225309+294082 records in
5367174+1 records out
SQL> exit
Disconnected from Oracle9i Enterprise Edition Release 9.2.0.6.0 - Production
With the Partitioning, OLAP and Oracle Data Mining options
JServer Release 9.2.0.6.0 - Production
[1]+ Done dd if=myspoolpipe.out of=aviad.out
$ ls -ltr
prw-r--r-- 1 oratest dba 0 Jun 24 12:22 myspoolpipe.out
-rw-r--r-- 1 oratest dba 2747993487 Jun 24 12:22 aviad.out
Related Notes:
Note 62427.1 - 2Gb or Not 2Gb - File limits in Oracle
Note 94486.1 - How to Create a SQL*Plus Spool File Larger Than 2 GB on UNIX
Aviad
Mix of Old & New style buttons in OA Framework pages
After some heavy patches applied on our system we noticed that some buttons in OAF pages looks like the old style gray buttons while the others are fine new style yellow buttons.
(The "Advanced" is the old style and all the others are the new style)
Trying to clear cache ($COMMON_TOP/_pages) and bounce Apache didn't solve the problem.
The solution is hiding within jserv.properties:
- Edit $IAS_ORACLE_HOME/Apache/Jserv/etc/jserv.properties
- Change the following to TRUE:
wrapper.bin.parameters=-Djava.awt.headless=true - (optional) Clear all content from $OA_HTML/cabo/images/cache (e.g rm -rf $OA_HTML/cabo/images/cache)
- (optional) Clear all content from $COMMON_TOP/_pages
- Bounce Apache
And the problem will be resolved...

In order to make this change permanent, you should update the Application context file as follow, otherwise next run of AutoConfig will overwrite your change.
- Edit $APPL_TOP/admin/$CONTEXT_NAME.xml
- Change the following to:
<java_awt_headless oa_var="s_java_awt_headless">true</java_awt_headless> - Run AutoConfig on Apps Tier.
- Bounce Apache
Related Note: 368188.1 - Buttons Are Not Rendering Correctly In Self Service Framework Pages.
Aviad
FND_GLOBAL affected by New Global Performance Changes
After applying ATG Rollup 5 patch (and above) we discovered an issue with some of our custom developments.
For some processes we got the following errors:
ORA-20001: Oracle error -20001: ORA-20001: Oracle error -4092: ORA-04092: cannot SET NLS in a trigger
has been detected in fnd_global.set_nls.set_parameter('NLS_LANGUAGE','AMERICAN').
has been detected in fnd_global.set_nls.
ORA-06512: at "APPS.APP_EXCEPTION", line 72
ORA-06512: at "APPS.FND_GLOBAL", line 240
ORA-06512: at "APPS.FND_GLOBAL", line 1410
ORA-06512: at "APPS.FND_GLOBAL", line 1655
ORA-06512: at "APPS.FND_GLOBAL", line 2170
ORA-06512: at "APPS.FND_GLOBAL", line 2312
ORA-06512: at "APPS.FND_GLOBAL", line 2250
and this:
ORA-20001: Oracle error -2074: ORA-02074: cannot SET NLS in a distributed transaction has been
detected in
fnd_global.set_nls.set_paramenters('NLS_LANGUAGE','AMERICAN').
After some debug work we found that this issue happens when executing FND_GLOBAL.apps_initialize more than once within a trigger/via a db link in the same transaction.
According to Note: 556391.1 - "ORA-02074: Cannot SET NLS in a Distributed Transaction" this issue cause by a new global performance changes.
Oracle Development said: "Very sorry if the new global performance changes have exposed you to this error, but there is no way we can back out these changes. They are not only complex and wide spread but required to maintain functional performance levels. Using fnd_global to change user/resp context from a trigger is not only not supported it is ill advised."
OK, So we had to find a workaround to this issues and we found two...
I'll start with a sample of the new behavior of fnd_global to demonstrate the issue and the solutions/workarounds will come right after.
SQL> create table test1 (a number, b number);
Table created
SQL> insert into test1 (a) values (1001);
1 row inserted
SQL> insert into test1 (a) values (1002);
1 row inserted
SQL> commit;
Commit complete
SQL> create or replace trigger test1_trg_bi
2 after update on test1
3 for each row
4 begin
5 fnd_global.APPS_INITIALIZE(:new.a,1,1);
6 -- fnd_request.submit_request...
7 -- ....
8 -- ....
9 end;
10 /
Trigger created
SQL> select fnd_global.user_id from dual;
USER_ID
----------
-1
SQL> update test1 set b=1101 where a=1001;
1 row updated
SQL> select fnd_global.user_id from dual;
USER_ID
----------
1001
SQL> update test1 set b=1102 where a=1002;
update test1 set b=1102 where a=1002
ORA-20001: Oracle error -20001: ORA-20001: Oracle error -4092: ORA-04092: cannot SET NLS in a trigger
has been detected in fnd_global.set_nls.set_parameter('NLS_LANGUAGE','AMERICAN').
has been detected in fnd_global.set_nls.
ORA-06512: at "APPS.APP_EXCEPTION", line 72
ORA-06512: at "APPS.FND_GLOBAL", line 240
ORA-06512: at "APPS.FND_GLOBAL", line 1410
ORA-06512: at "APPS.FND_GLOBAL", line 1655
ORA-06512: at "APPS.FND_GLOBAL", line 2170
ORA-06512: at "APPS.FND_GLOBAL", line 2312
ORA-06512: at "APPS.FND_GLOBAL", line 2250
ORA-06512: at "APPS.TEST1_TRG_BI", line 2
ORA-04088: error during execution of trigger 'APPS.TEST1_TRG_BI'
As you can see, the second update failed because apps_initialize was executed for the second time in the same transaction.
Now I'll show two ways to workaround this issue:
1) As suggested in Note: 556391.1 - "ORA-02074: Cannot SET NLS in a Distributed Transaction" a wrapper Concurrent Request which contain a call to the context set (apps_initialize) and afterwards submits the original request, is one possible solution.
instead:
create or replace trigger test1_trg_bi
after update on test1
for each row
declare
. . .
begin
fnd_global.APPS_INITIALIZE(:new.a,1,1);
ret_code := fnd_request.submit_request ('OWNER', 'ORIGINAL_CONC', . . .);
. . .
. . .
end;
create the following trigger:
create or replace trigger test1_trg_bi
after update on test1
for each row
declare
. . .
begin
ret_code := fnd_request.submit_request ('OWNER', 'WRAPPER_CONC', . . . , :new.a, . . . );
. . .
. . .
end;
additionally - create a new plsql concurrent (WRAPPER_CONC) that contains the fnd_global.apps_initialize and submits the ORIGINAL_CONC concurrent request.
This way, the apps_initialize statement executed in a separate transaction with no error.
This is the preferred and recommended solution by Oracle.
2) The second solution is easier to implement, works fine but according to Note: 556391.1 is not supported since it contains calls to fnd_global within a database trigger.
Anyway...
The idea is to call the apps_initialize in an Autonomous Transaction procedure.
Follow this sample:
SQL> create or replace procedure test1_apps_init (p_user_id number) is
2 pragma autonomous_transaction;
3 begin
4 fnd_global.APPS_INITIALIZE(p_user_id,1,1);
5 commit;
6 end;
7 /
Procedure created
SQL> create or replace trigger test1_trg_bi
2 after update on test1
3 for each row
4 begin
5 test1_apps_init (:new.a);
6 -- fnd_request.submit_request...
7 -- ....
8 -- .....
9 end;
10 /
Trigger created
SQL> select fnd_global.user_id from dual;
USER_ID
----------
-1
SQL> update test1 set b=1101 where a=1001;
1 row updated
SQL> select fnd_global.user_id from dual;
USER_ID
----------
1001
SQL> update test1 set b=1102 where a=1002;
1 row updated
SQL> select fnd_global.user_id from dual;
USER_ID
----------
1002
As you can see, the update statements were executed successfully this time and the session was updated with the appropriate user context in each update statement.
Those two solutions are working fine, but keep in mind that the second is not supported.
You are welcome to leave a comment.
Aviad
Oracle Transparent Gateways - General Description - Part I
A lot of companies have several applications based on more than one database system (e.g DB2, SQL Server, Sybase, etc).
Each database system store its own data and naturally there's a need to share data among the various heterogeneous database systems.
Oracle, starting with Oracle Database 9i, offers the "Oracle Transparent Gateways" (Oracle Database Gateways) to allow integration of Oracle database with non-Oracle databases.
Unlike "Oracle Generic Connectivity" that provide a generic solution to connect any ODBC/OLEDB compliant non-Oracle system using ODBC and OLEDB standards, the "Oracle Transparent Gateways" are solutions specifically tailored for each target non-Oracle database system.
The "Oracle Transparent Gateways" communicates using the target database native interface, it's make it possible to access to non-Oracle systems as if they were Oracle databases.
The Transparent Gateway solution composed of two parts:
- Heterogeneous Services (HS) - this is a general integrated component that make it possible to connect to non-Oracle systems from Oracle database
- Oracle Database Gateways (agent) - these are specific tailored agents for non-Oracle systems that make it possible to interacts with the target non-Oracle system.
Heterogeneous Services (HS)
This is a generic component for connecting to non-Oracle systems.
It's an integrated component of the database that "extends the Oracle SQL engine to recognize the SQL and procedural capabilities of the remote non-Oracle system and the mappings required to obtain necessary data dictionary information" (Oracle Doc').
The following services are provided by the Heterogeneous Services (HS):
- Transaction service
Responsible for establishing authenticated connection when the non-Oracle system is accessed and close the connection when session end.
Also responsible for global data integrity using two phase commit protocol, even for non-Oracle systems that do not support two phase commit natively. - SQL Service
Provide the translation capabilities: SQL & data dictionary translations.
The SQL services uses an information arrived from the Gateway to translate Oracle SQL to the appropriate SQL dialect of the non-Oracle system. Also, references to data dictionary tables in a query will be rewrite by the SQL Service and result with a result set as from Oracle database.
** Data type translation performed by the Gateway. - Procedural Service
An interface for executing stored procedures on non-Oracle system. - Pass through SQL
A mechanism for issuing a SQL statement against the non-Oracle system. It is useful when the statement/function/procedure are not supported by the Gateway.
Oracle Database Gateways (agents)
This component responsible for the interface to the remote non-Oracle system.
It's also responsible for SQL mappings and data type conversions.
The Gateway interacts with Heterogeneous Services to make it possible to transparently connect from an Oracle Database to a non-Oracle System.
In contrast to the HS (Heterogeneous Services) which is a generic component, the Gateways are tailored specifically for each target non-Oracle system.
There are Gateways for many systems such as: DB2, Sybase, Informix, SQL Server, IMS, VSAM, Adabas, Ingres, Teradata, to name a few.
The Gateway can be installed on the same server like the non-Oracle system or on the same server like the Oracle system or on a separate server.
Next post I'll show an example of connecting and retrieving data from a SQL Server database to an Oracle database using Oracle Transparent Gateway for Microsoft SQL Server including all configuration required for Transparent Gateway and the source Oracle System.
Related Documents for more information:
- Database Gateways Technical Whitepaper
You are more than welcome to leave a comment.
Aviad
Forgot your Password?
Almost every website that uses username & password have a "forget password" functionality to retrieve users passwords, and so also the Oracle E-Business Suite.
This is a very useful functionality since it reduces the number of SR's opened to the helpdesk team regarding login problems and moreover satisfying the customers which can get a new password in a very short time with no helpdesk intervention.
The implementation of this functionality is very simple and easy.
To enable it you should:
- set the profile "Local Login Mask" to the current value plus 8 (e.g. current value is 32 -> set value to 40)
- Bounce Apache
The "Local Login Mask" profile used to customize some attributes of the login page (AppsLocalLogin.jsp), one of them is the "forgot your password" link.
You should set the value of this profile to the sum of all attribute's mask values you are interested in.
The full attributes list is:
Attribute
Mask Value Binary value Hint for Username 01 00000001 Hint for Password 02 00000010 Cancel button 04 00000100 Forgot Password link 08 00001000 Registration link 16 00010000 Language Images 32 00100000 Corporate Policy Message 64 01000000
Setting the Forgot Password link mask value will add the following TIP to the login page:

The reset password process:
- Click on "Forgot your password?" link will ask for a username to which reset the password.
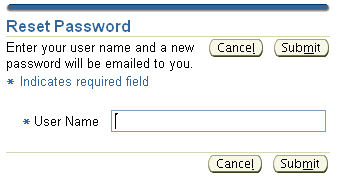
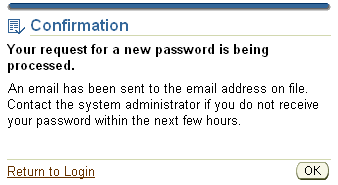
- After typing the username and click OK, a new workflow process is started (Item type UMXUPWD) and you'll get this confirmation message:
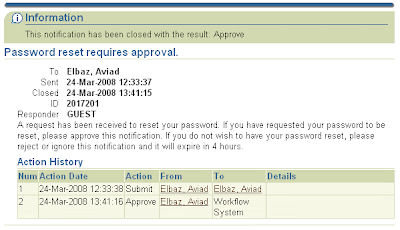
- Shortly you'll get this email - "Password reset required approval" (expired after 4 hours).
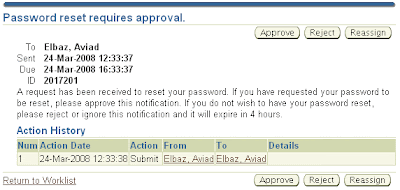
- Click on "Approve" to confirm you are interested in a new password.
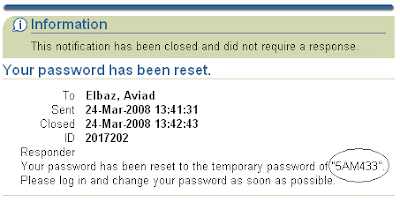
- Shortly you'll get an email with a temporary password which you have to change on first login.
Very nice and easy to implement functionality, which could be very beneficial.
Related Note 399766.1 - Reset Password Functionality FAQ
You are welcome to leave a comment
Aviad
Upgrade from Jinitiator 1.3 to Java Plugin 1.6.0.x
Lately Oracle announced the end of Error Correction Support for Jinitiator 1.3 for E-Business Suite 11i, effective July 2009.
This is the sign it’s about time to upgrade to the native Java Plug-in… :-)
Among other things, one of the main advantages of upgrading from Jinitiator to the native Java Plug-in is the prevention of conflicts between them.
This upgrade is great news to all are working with Oracle Discoverer Plus (with Java plug-in) and Oracle EBS 11i (with Jinitiator) and experiencing those conflicts.
I’ll skip all the others advantages and disadvantages of upgrading to Java Plug-in as they are well described in Steven Chan’s post - Jinitiator 1.1.8 To Be Desupported for Apps 11i and in Metalink Note: 290807.1 - Upgrading Sun JRE with Oracle Applications 11i.
So I will focus on the upgrade process itself - step by step.
I tested the upgrade on the following test environment:
- EBS 11.5.10.2
- Database 10.2.0.3
- ATG Rollup 5
- Developer 6i patchset 18
- OS RHEL4.
Be aware that before upgrading to Java Plug-in you must upgrade to Developer 6i patchset 18 or later (currently the latest patchset is 19).
* You can use my previous post in order to Upgrading Developer 6i with Oracle Apps 11i to patchset 18.
- Download JRE plug-in Oracle E-Business Suite interoperability patch - 6863618
- Download the Sun JRE Plug-in
- Select Java Runtime Environment (JRE) 6 Update X (select the latest available update, currently it’s 5)
- Select Windows offline installation, multi-language
- Rename the downloaded installation file jre-6_uX-windows-i586-p.exe to j2se1600x.exe
In my case rename jre-6_u5-windows-i586-p.exe to ==>> j2se16005.exe - Copy the j2se1605.exe file to $COMMON_TOP/util/jinitiator on the Apps Tier node
- If you are on Developer 6i patchset 18 you should apply forms patches 6195758 & 5884875.
** Skip this step if you are on Developer 6i patchset 19.- Download Patches 6195758 & 5884875
- Apply patch 6195758
- Stop all applications processes by adstpall.sh
- Unzip p6195758_60827_GENERIC.zip
- cd 6195758
- cp -r $ORACLE_HOME/forms60/java/oracle/forms/
handler/UICommon.class $ORACLE_HOME/forms60/java/oracle/forms/
handler/UICommon.class.PRE_BUG6195758 - cp -r $ORACLE_HOME/forms60/java/ oracle/forms
/handler/ComponentItem.class $ORACLE_HOME/forms60/java/oracle/forms/
handler/ComponentItem.class.PRE_BUG6195758 - cp oracle/forms/handler/UICommon.class $ORACLE_HOME/forms60/java/oracle/forms/
handler/UICommon.class - cp oracle/forms/handler/ComponentItem.class $ORACLE_HOME/forms60/java/oracle/forms/
handler/ComponentItem.class
- Apply Patch 5884875
- Unzip p5884875_60827_GENERIC.zip
- cd 5884875
- cp -r $ORACLE_HOME/forms60/java/oracle/forms/engine/Main.class $ORACLE_HOME/forms60/java/oracle/forms/
engine/Main.class.PRE_BUG5884875 - cp -r $ORACLE_HOME/forms60/java/ oracle/forms/
handler/AlertDialog.class $ORACLE_HOME/forms60/java/oracle/forms/
handler/AlertDialog.class.PRE_BUG5884875 - cp oracle/forms/engine/Main.class $ORACLE_HOME/forms60/java/oracle/forms/engine/Main.class
- cp oracle/forms/handler/AlertDialog.class $ORACLE_HOME/forms60/java/oracle/forms/
engine/AlertDialog.class - Run adadmin -> Generate Applications Files menu -> Generate product JAR files
- Apply the Interoperability patch 6863618
- Make sure all applications processes are down
- Enable maintenance mode:
Execute adadmin -> Change Maintenance Mode (5) -> Enable Maintenance Mode (1) - Unzip p6863618_11i_GENERIC.zip
- Cd 6863618
- Run adpatch to apply patch driver u6863618.drv
- cd [PATCH_NUMBER]/fnd/bin
- Execute the following command where X represent the update number:
$ txkSetPlugin.sh 1600X
In my case:
$ txkSetPlugin.sh 16005 - Disable maintenance mode:
Execute adadmin -> Change Maintenance Mode (5) -> Disable Maintenance Mode (2)
- Start all applications processes by adstrtall.sh
- Verify installation by sign in Oracle EBS and select a forms based responsibility.
For those who worry about performance, take a look at this benchmark:
Benchmark comparison test with Jinitiator 1.3.1.23 and Java Plug-in 1.5.0_05 – performance whitepaper
For more information - Note: 290807.1 - Upgrading Sun JRE with Oracle Applications 11i
Aviad
UTL_FILE_DIR issue after applying patch 5985992 'TXK AUTOCONFIG RUP Q'
Do you have more than 240 characters in your utl_file_dir?
if so, you should read this before applying patch 5985992 'TXK AUTOCONFIG RUP Q (Jul/Aug 2007)'.
After applying this patch, AutoConfig on database tier failed with the following error:
[PROFILE PHASE]
AutoConfig could not successfully execute the following scripts:
Directory: [RDBMS_ORACLE_HOME]/appsutil/install/[context_name]
afdbprf.sh INSTE8_PRF 1
AutoConfig is exiting with status 1
It wasn't clear why afdbprf.sh failed so I ran it manually from ssh terminal and I got this:
$ [RDBMS_ORACLE_HOME]/appsutil/install/[context_name]/afdbprf.sh
afdbprf.sh started at Tue Jan 29 17:43:21 IST 2008
The environment settings are as follows ...
ORACLE_HOME : ....
.........
.........
Application Id : 0
Profile Name : BIS_DEBUG_LOG_DIRECTORY
Level Id : 10001
New Value : /usr/tmp
Old Value : /usr/tmp
declare
*
ERROR at line 1:
ORA-12899: value too large for column
"APPLSYS"."FND_PROFILE_OPTION_VALUES"."PROFILE_OPTION_VALUE" (actual: 486,
maximum: 240)
ORA-06512: at line 44
ORA-06512: at line 139
Looking into afdbprf.sql (executed by afdbprf.sh) reveals the problem:
.......
--Setting BIS_DEBUG_LOG_DIRECTORY
set_profile(0, 'BIS_DEBUG_LOG_DIRECTORY',
10001, 0,
'&BIS_DEBUG_LOG_DIR',
NULL);
-- This profile option was earlier set in addbprf.sql via bug 2843457, Now moved here for bug 5722442
--
-- Set up UTL_FILE_LOG profile option
--
set_profile(1, 'UTL_FILE_LOG',
10001, 0, '/usr/tmp,........[more than 240 characters..... :-) ]',
NULL);
In order to fix bug 5722442, the UTL_FILE_LOG updated with the value of s_db_util_filedir from the database context file and a new bug was created (not a bug according to Bug 6404909).
If the s_db_util_filedir contains more than 240 characters it can't be stored in a profile since the PROFILE_OPTION_VALUE column defined as varchar2(240).
The s_db_util_filedir initialized when creating the database context file by adbldxml.pl, and set up with the value of utl_file_dir database parameter.
I'm not sure why it should be updated with all directories within utl_file_dir and not with the relevant directories only...?!
The UTL_FILE_LOG profile (or "Stored procedure log directory") wasn't updated with AutoConfig before applying this patch, so I'm not sure regarding the purpose of this profile.
Before applying this patch I have this profile set to a directory that doesn't exist...
The solution according to Note:458511.1 - "After patch 5985992 AutoConfig On Database Tier Fails with script afdbprf.sh" is to change the value of s_db_util_filedir in the database context file to a value less the 240 characters and run AutoConfig again.
And it works, of course...
What should I do if I my utl_file_dir contains more than 240 characters?!
Actually I don't have a good answer to this question but I will try to locate all the places on which this issue might affect when s_db_util_filedir will be updated with a value less than 240 chars.
- AutoConfig on the DB Tier creates the [SID]_APPS_BASE.ora file under $RDBMS_ORACLE_HOME/dbs (if it's not already exist), which contains the utl_file_dir database parameter generated respectively to the s_db_util_filedir from the database context file.
So if you plan to rebuild your init.ora with AutoConfig you will need to update the utl_file_dir manually.
- When executing adbldxml.pl on DB Tier to rebuild the database context file, the s_db_util_filedir will be filled with the utl_file_dir database parameter - that might contain more than 240 chars.
Therefore, before executing AutoConfig you should edit the new context file and shorten the value of s_db_util_filedir. - The UTL_FILE_LOG profile ("Stored procedure log directory") will be updated with s_db_util_filedir shortened value.
You are welcome to leave a comment or update with additional information regarding this issue.
Aviad


